Check out our shop! We have limited Edition Wagons still available. We now have a series of second-hand books for sale! AND with changes to our packaging we can offer reduced postage fees! Dismiss
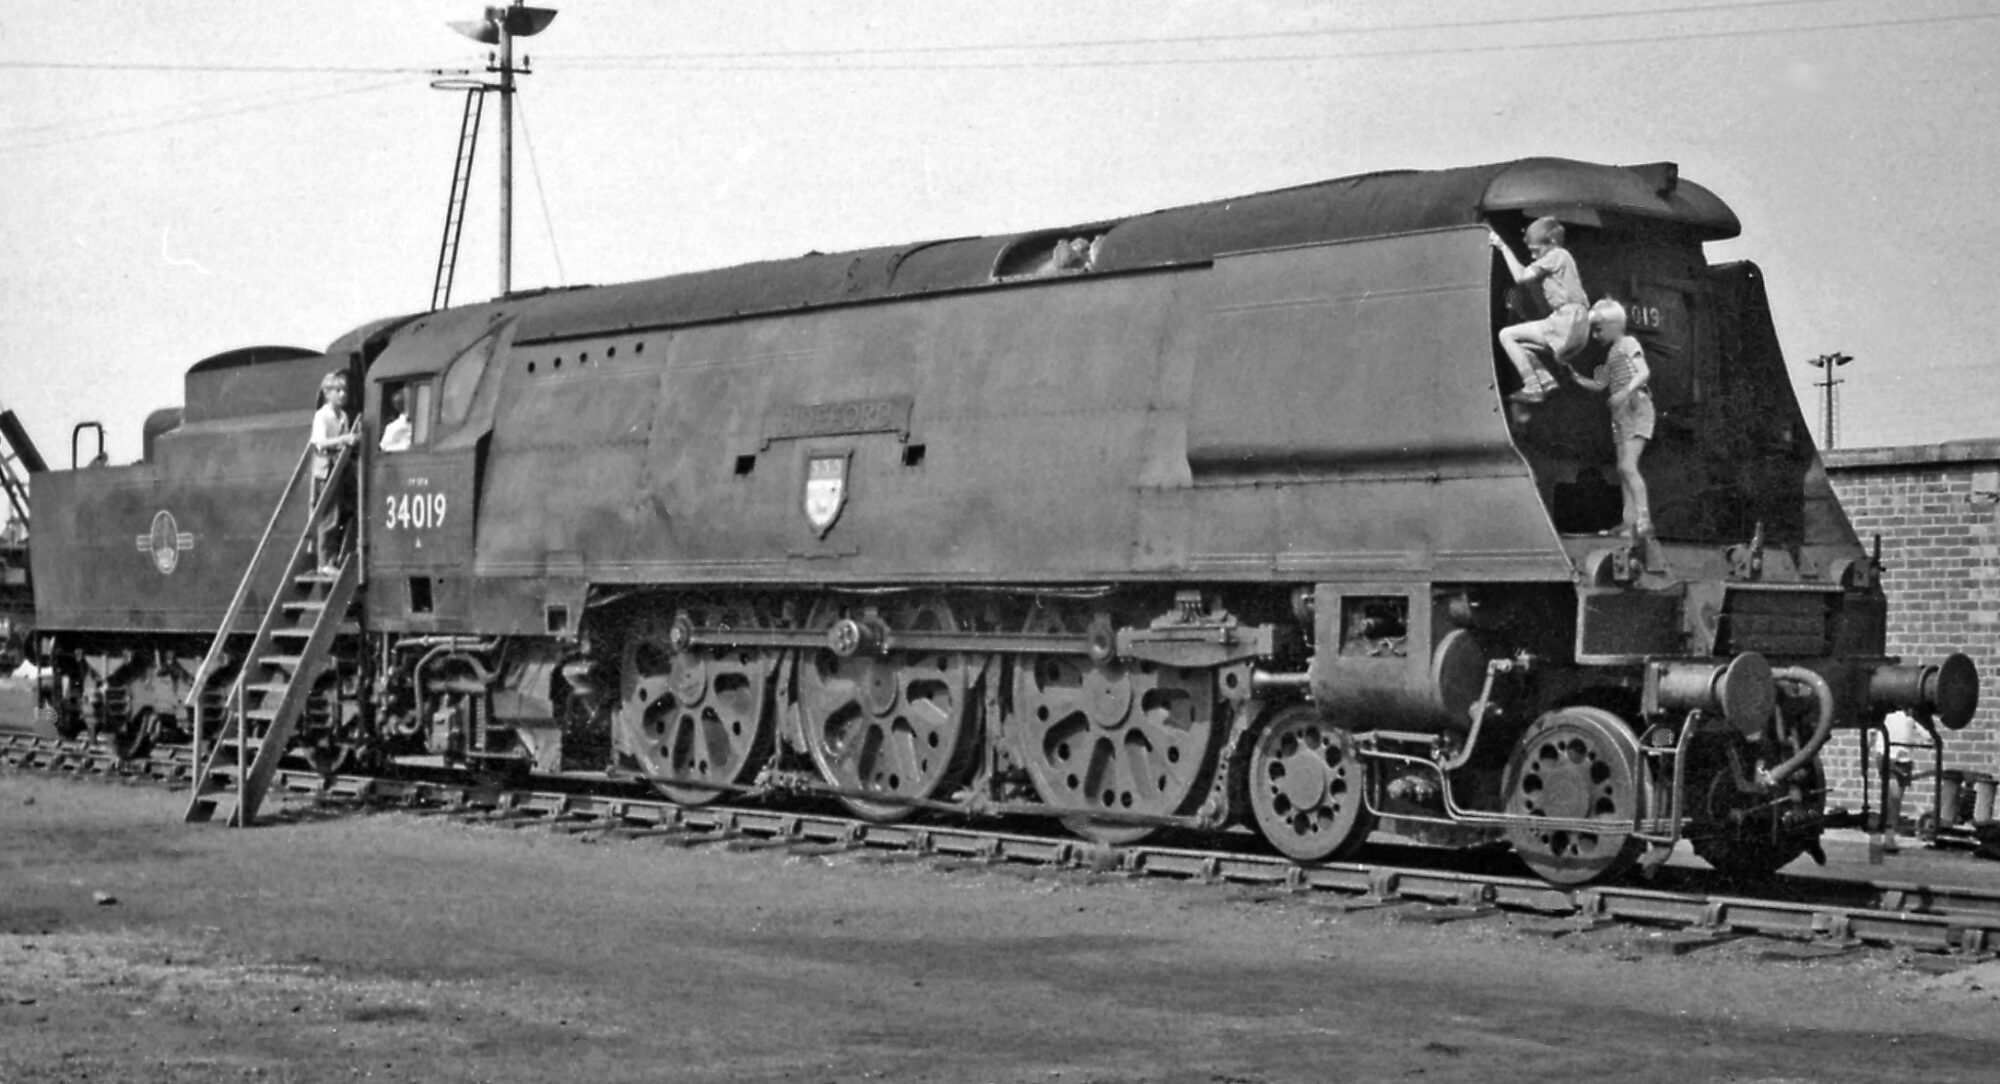
Model railways are more than just a hobby—they’re a blend of artistry, engineering, and nostalgia. Whether you’re a seasoned modeller or just starting out, keeping your locomotives running smoothly is key to an enjoyable and realistic railway experience. Among the most vital, yet often underestimated, aspects of maintenance is cleaning your loco’s wheels.
Over time, dirt, dust, oil, and even microscopic metal particles from the rails can build up on wheel treads and pickups. This grime can severely affect performance, leading to jerky movement, stalled starts, flickering lights, or even damage to motors and decoders. The good news? With a few simple tools and the right technique, wheel cleaning can be a quick and satisfying part of your routine that makes a big difference.
This guide offers a step-by-step, easy-to-follow method for cleaning locomotive wheels safely and effectively. It also highlights common risks, how to avoid them, and tips for maintaining a reliable model railway fleet.
Tools and Materials You Will Need:
Isopropyl alcohol (preferably 90% or higher)
Cotton buds (Q-tips) or lint-free cloths
Toothpicks or small brushes (for compact areas)
Foam cradle or folded towel (to rest the loco safely)
Tweezers (optional, for precision cleaning)
Magnifying glass (optional, for visual inspection)
Power pack/controller or rolling road (optional for powered cleaning)
Step-by-Step Cleaning Procedure:
1. Power Down and Prepare the Workspace
Unplug the loco from any track or power source.
Clear a clean, well-lit workspace.
Lay down a foam cradle or towel to support the loco and protect delicate details.
2. Inspect the Wheels
Use a magnifying glass to check for dirt, oil, or oxidation.
Look for areas around the wheel tread and flange where gunk tends to build up.
3. Manual Wheel Cleaning (Preferred Method)
Dip a cotton bud into isopropyl alcohol.
Gently rotate each wheel by hand while rubbing the wheel tread with the soaked cotton bud.
Replace the bud as it becomes dirty to avoid spreading grime.
Tip: Focus on applying light pressure. Let the alcohol break down the dirt rather than using force.
4. Optional: Powered Cleaning
If you’re comfortable and have the necessary tools:
Set the loco on a rolling road or upside down in the cradle.
Connect the power pack to the motor pickups.
Run the loco slowly and carefully hold an alcohol-dampened cloth or bud against the spinning wheels.
Important: Keep voltage low and avoid prolonged spinning to prevent motor damage.
5. Clean Pickup Areas and Back of Wheels
Use a toothpick or brush to dislodge dirt from around axle ends, pickup contacts, and wheel backs.
Gently wipe these areas with an alcohol-moistened cloth.
6. Final Drying and Inspection
Use a clean, dry cotton bud to wipe down each wheel after cleaning.
Check that all residue is gone and no fibers are left behind.
Risks and How to Avoid Them
Potential Risk
What Can Happen
How to Prevent It
Wheel plating damage
Abrasives can remove the nickel or blackened finish
Never use sandpaper or track rubbers on wheels
Breaking detail parts
Mishandling can snap off couplings, pipes, or other small pieces
Always rest loco on soft surfaces and handle by the main body
Short circuits
Conductive tools touching powered wheels can cause shorts
Use non-conductive cleaning tools and disconnect power
Motor strain or overheating
Running wheels too fast during powered cleaning can burn out motors
Use low voltage, short bursts; never leave wheels spinning freely
Residue attraction
Oily cleaners leave residue that collects more dust
Use only pure isopropyl alcohol, and always dry thoroughly
Cleaning Frequency Guide
Frequent runners or dusty environments: Clean every 2–3 weeks
Occasional use or clean layouts: Clean every 2–3 months
Signs it’s time to clean:
Jerky or stalled running
Flickering lights or sound
Poor slow-speed performance
Bonus Tips:
Label a small container for used cotton buds to avoid reusing dirty ones.
Keep a log of maintenance dates to track cleaning and performance issues.
Clean your track at the same time for best results.
For DCC locos, be extra careful around decoder wiring and components.
Suggested Maintenance Schedule
Task
Frequency
Wheel cleaning
Every 10–20 hours of use
Track cleaning
Monthly or as needed
Loco lubrication
Every 30–40 hours of use
Visual inspection
Every running session
With regular care and the right technique, your locomotives will perform reliably and look great for years to come. Happy modelling!
Understanding DCC Decoders and Configuration Variables (CVs)
What is a DCC Decoder?
A DCC (Digital Command Control) decoder is an electronic device installed inside a model railway locomotive, lighting coach, or accessory that receives digital signals from a DCC controller. These signals tell the decoder how to operate various functions such as motor control, lighting, and sound. Each decoder is programmed to respond to a unique address, allowing individual control of locomotives or accessories on the same track.
There are several types of DCC decoders:
Locomotive Decoders: Control motor speed, direction, lights, and sometimes sound.
Sound Decoders: In addition to motor control, they produce realistic sounds (e.g., engine, horn, brake squeal).
Accessory Decoders: Control items such as points (turnouts), signals, and lighting accessories.
What are Configuration Variables (CVs)?
Configuration Variables, or CVs, are programmable memory locations inside a DCC decoder that determine how it behaves. Each CV has a specific number and stores a value that affects a particular function, such as how fast the locomotive accelerates or what address it responds to.
CVs are fundamental to customizing your locomotive’s performance and behaviour. For example, you can:
Set the locomotive’s DCC address (CV1 or CV17/18)
Adjust acceleration and deceleration rates (CV3 & CV4)
Modify lighting effects (CV49–CV52)
Enable or disable advanced features like Back-EMF, RailCom, or speed tables
Why Use CVs?
Using CVs allows railway modellers to tailor the performance of their models to match real-world railway operation, layout conditions, or personal preferences. Fine-tuning with CVs improves running quality, realism, and compatibility in multi-train operations.
How to Read and Write CVs
CVs are read and written using a DCC controller or programming tool. Most systems support two modes:
Programming Track Mode: Isolates the locomotive for safe programming
Main Track Programming (POM – Programming on the Main): Allows CV changes without removing the loco from the layout
More advanced CV programming is done using tools like:
JMRI DecoderPro (a free graphical interface for CV editing)
Train-O-Matic, TCS, Zimo, ESU, etc. all host charts for each decoder line.
Forums like RMWeb, Model Rail Forum, or ModelRailroadForums
Summary: Best Way to Get All CVs
You Want…
Best Tool
Beginner-friendly setup
JMRI DecoderPro
Full manufacturer control
Manufacturer software
Quick lookup or comparison
Manufacturer manuals
Custom setups or speed curves
JMRI or Zimo/ESU tools
Summary
DCC decoders are essential for modern model railway control, allowing precise and independent operation of locomotives and accessories. Configuration Variables (CVs) provide the flexibility to customize every aspect of decoder behavior, from basic addressing to complex sound and lighting effects.
Understanding CVs empowers modellers to take full control of their locomotives, enabling them to create more realistic, efficient, and enjoyable railway operations. Whether you’re adjusting acceleration curves, programming lighting patterns, or synchronising sound functions, CVs are the key to unlocking the full potential of DCC. By learning how to read, write, and interpret these variables, hobbyists can move from basic running to advanced railway modelling with confidence and creativity.
Model railways have long captured the imagination of enthusiasts across the UK, offering a rich blend of engineering, artistry, and nostalgia. Central to any model railway layout is the concept of gauge and scale, two closely related but distinct measurements that dictate the appearance and compatibility of rolling stock and track systems. This article delves into the different gauges of model railways popular in the UK, providing a comprehensive guide for beginners and seasoned modellers alike.
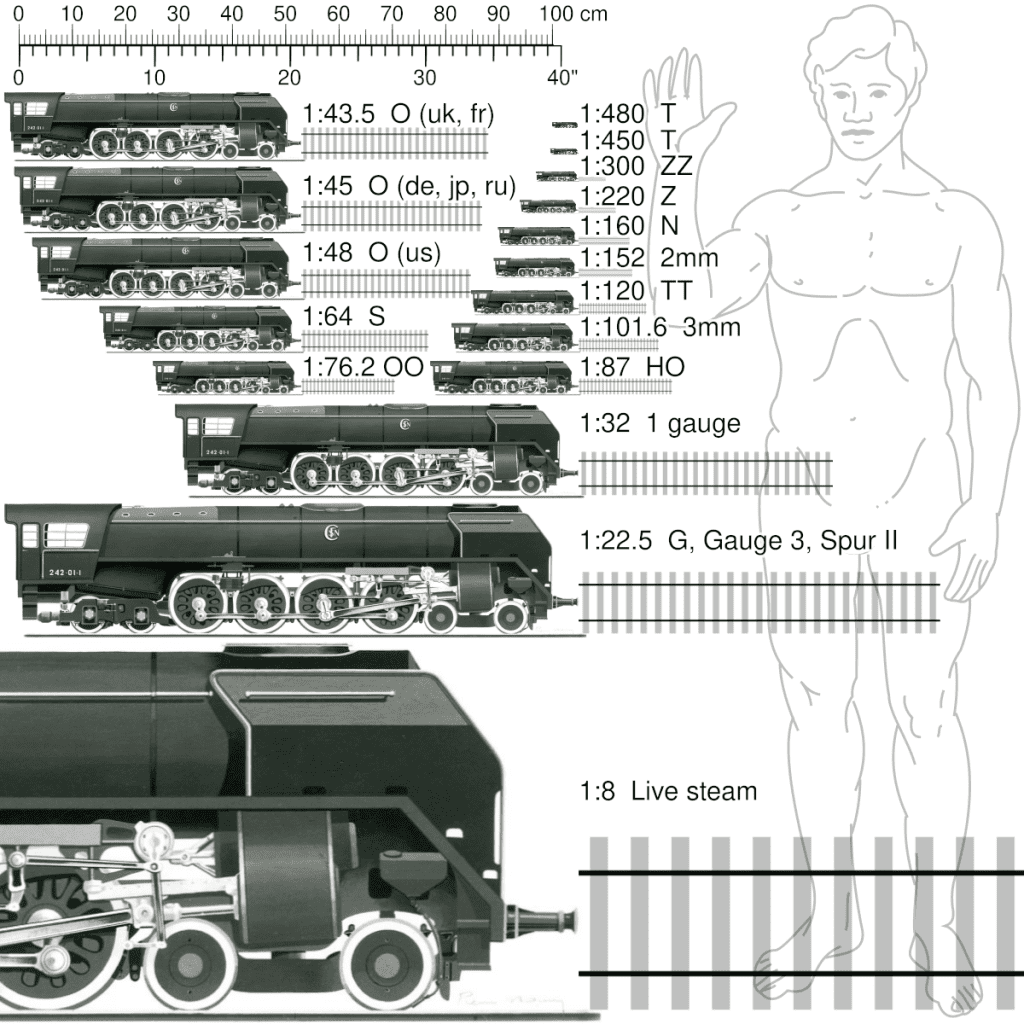
To begin, it’s important to distinguish between ‘scale’ and ‘gauge.’ Scale refers to the ratio of the model’s size to that of the real-life prototype. For example, a 1:76 scale means the model is 1/76th the size of its real-world counterpart. Gauge, however, refers to the distance between the inner edges of the rails on the track. While these two terms are often used interchangeably, understanding the difference is essential for building an accurate and functional layout.
The most widely used scale in the UK is OO gauge, which operates at a 1:76.2 scale with a track gauge of 16.5mm. Initially developed in the 1930s, OO gauge emerged as a uniquely British solution to early motor size constraints, using the same track gauge as HO scale (1:87), yet at a slightly larger scale. This discrepancy means that while the models are 4mm to the foot, the track is technically undersized. Despite this compromise, OO gauge remains the most popular choice among UK modellers, with a vast range of ready-to-run locomotives, rolling stock, and accessories from manufacturers such as Hornby, Bachmann Branchline, and Dapol. Layouts in OO gauge often feature detailed scenic elements, realistic structures, and a variety of operational setups, making it a versatile option for both novice and experienced modellers.
N gauge represents the second most popular scale in the UK, offering a scale of 1:148 and a track gauge of 9mm. Its compact size makes it ideal for those with limited space, allowing for more elaborate layouts in smaller areas. N gauge also lends itself to scenic modelling, with long trains and broad vistas fitting comfortably into modest layouts. Leading manufacturers include Graham Farish, Dapol, and Peco, all of whom offer a growing range of UK-outline models. The reduced size does not mean reduced quality—modern N gauge models often feature impressive levels of detail, reliable mechanisms, and digital control compatibility. Many enthusiasts appreciate N gauge’s ability to represent complex rail networks and rural or industrial scenes in a relatively small footprint.
For those seeking greater realism and larger models, O gauge provides a scale of 1:43.5 and a track gauge of 32mm. This larger scale allows for a high degree of detail and is well-suited to modellers with the space and resources to accommodate its size. O gauge has traditionally been associated with more experienced hobbyists and often involves scratch-building or kit assembly. However, recent developments have seen a rise in ready-to-run offerings from companies such as Dapol, Heljan, and Lionheart Trains. The visual impact of O gauge is striking, with large locomotives and rolling stock that command attention. This scale’s layout often prioritises realism and slow-speed operation, enhancing the sense of weight and presence.
Though less common in the UK, HO gauge holds global popularity and features a scale of 1:87 with the same 16.5mm track gauge as OO. As a result, HO and OO models can run on the same track, but their differing scales make them visually incompatible. HO is favoured by those interested in modelling Continental or American railroads and is supported by an extensive catalogue of international manufacturers, including Roco, Fleischmann, and Märklin. For modellers who wish to replicate foreign railways with a high degree of authenticity, HO provides a wealth of options, from diesel-era North American locomotives to modern European high-speed trains.
Emerging more recently is TT:120, a scale of 1:120 operating on a 12mm gauge track. This scale offers a middle ground between OO and N gauges, combining the detail of larger scales with the space-saving advantages of smaller ones. Hornby has championed this scale in the UK, launching a new line of TT:120 models that has reinvigorated interest in this format. For modellers seeking an efficient compromise, TT:120 may offer the ideal solution. The scale allows for accurate detail while enabling layouts to fit in smaller rooms or portable exhibition formats. TT:120 is expected to attract a new generation of enthusiasts as more products become available.
Finescale modelling has led to the development of alternative gauges such as EM and P4. Both maintain the 4mm to the foot scale of OO but correct the track gauge to represent the prototype more accurately. EM gauge uses an 18.2mm track, while P4 (Scalefour) extends this further to 18.83mm for maximum fidelity. These formats demand precision and are often the domain of advanced hobbyists who prefer to hand-lay track and modify wheelsets for authenticity. Finescale modelling is more than a pursuit of accuracy—it’s a craft that rewards attention to detail and a deep understanding of railway mechanics. Modellers working in EM or P4 often produce museum-quality layouts that showcase the finest aspects of British railway history.
The G scale is at the larger end of the spectrum, typically at a 1:22.5 scale and using a 45mm gauge track. G scale is synonymous with garden railways, which are robust enough to withstand outdoor conditions. While not specific to British prototypes, it appeals to enthusiasts interested in outdoor scenic layouts and dramatic landscapes. G scale offers an entirely different experience from indoor modelling, with layouts often incorporating real plants, weathering effects, and seasonal changes. Garden railway modellers usually value durability and visual drama, making G scale ideal for long-term, low-maintenance enjoyment.
The correct gauge depends mainly on individual preferences, available space, and modelling goals. While the OO gauge remains the most accessible and widely supported, other scales, each offer unique advantages, from the space-saving benefits of the N gauge to the unparalleled realism of P4. Additionally, digital control systems such as DCC (Digital Command Control) are now available across most scales, enabling greater operational realism and simplifying layout wiring. The UK modelling community is also supported by an active network of exhibitions, clubs, and online forums, providing invaluable resources for inspiration, advice, and camaraderie.
With a deeper understanding of the scales and gauges available, UK modellers are better equipped to craft layouts that reflect their technical ambitions and personal vision. Whether your interest lies in recreating the golden age of steam, modern commuter services, or whimsical fantasy railways, there is a gauge to suit every modeller’s dream. As technology advances and the range of products continues to expand, the world of British model railways offers more opportunities than ever before to bring miniature landscapes to life.
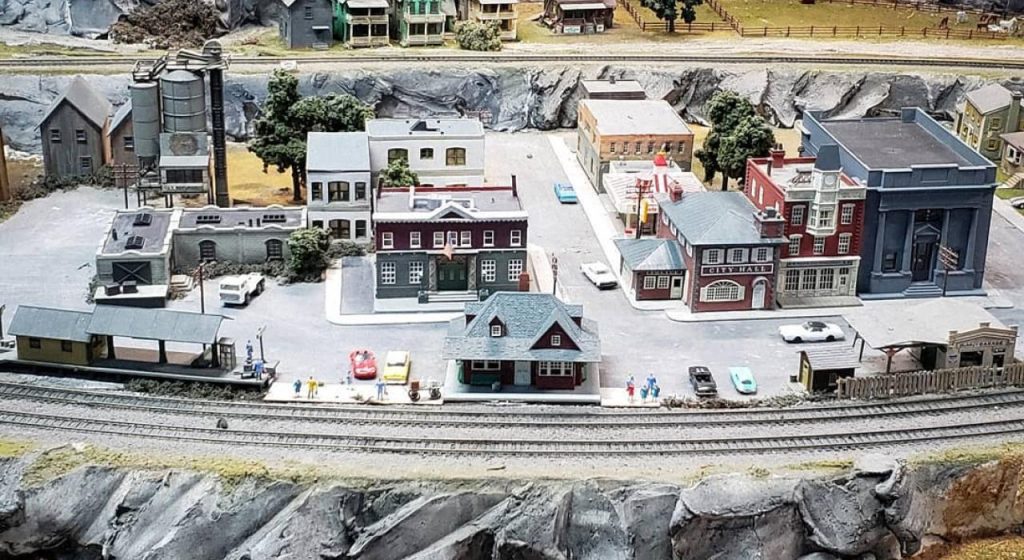
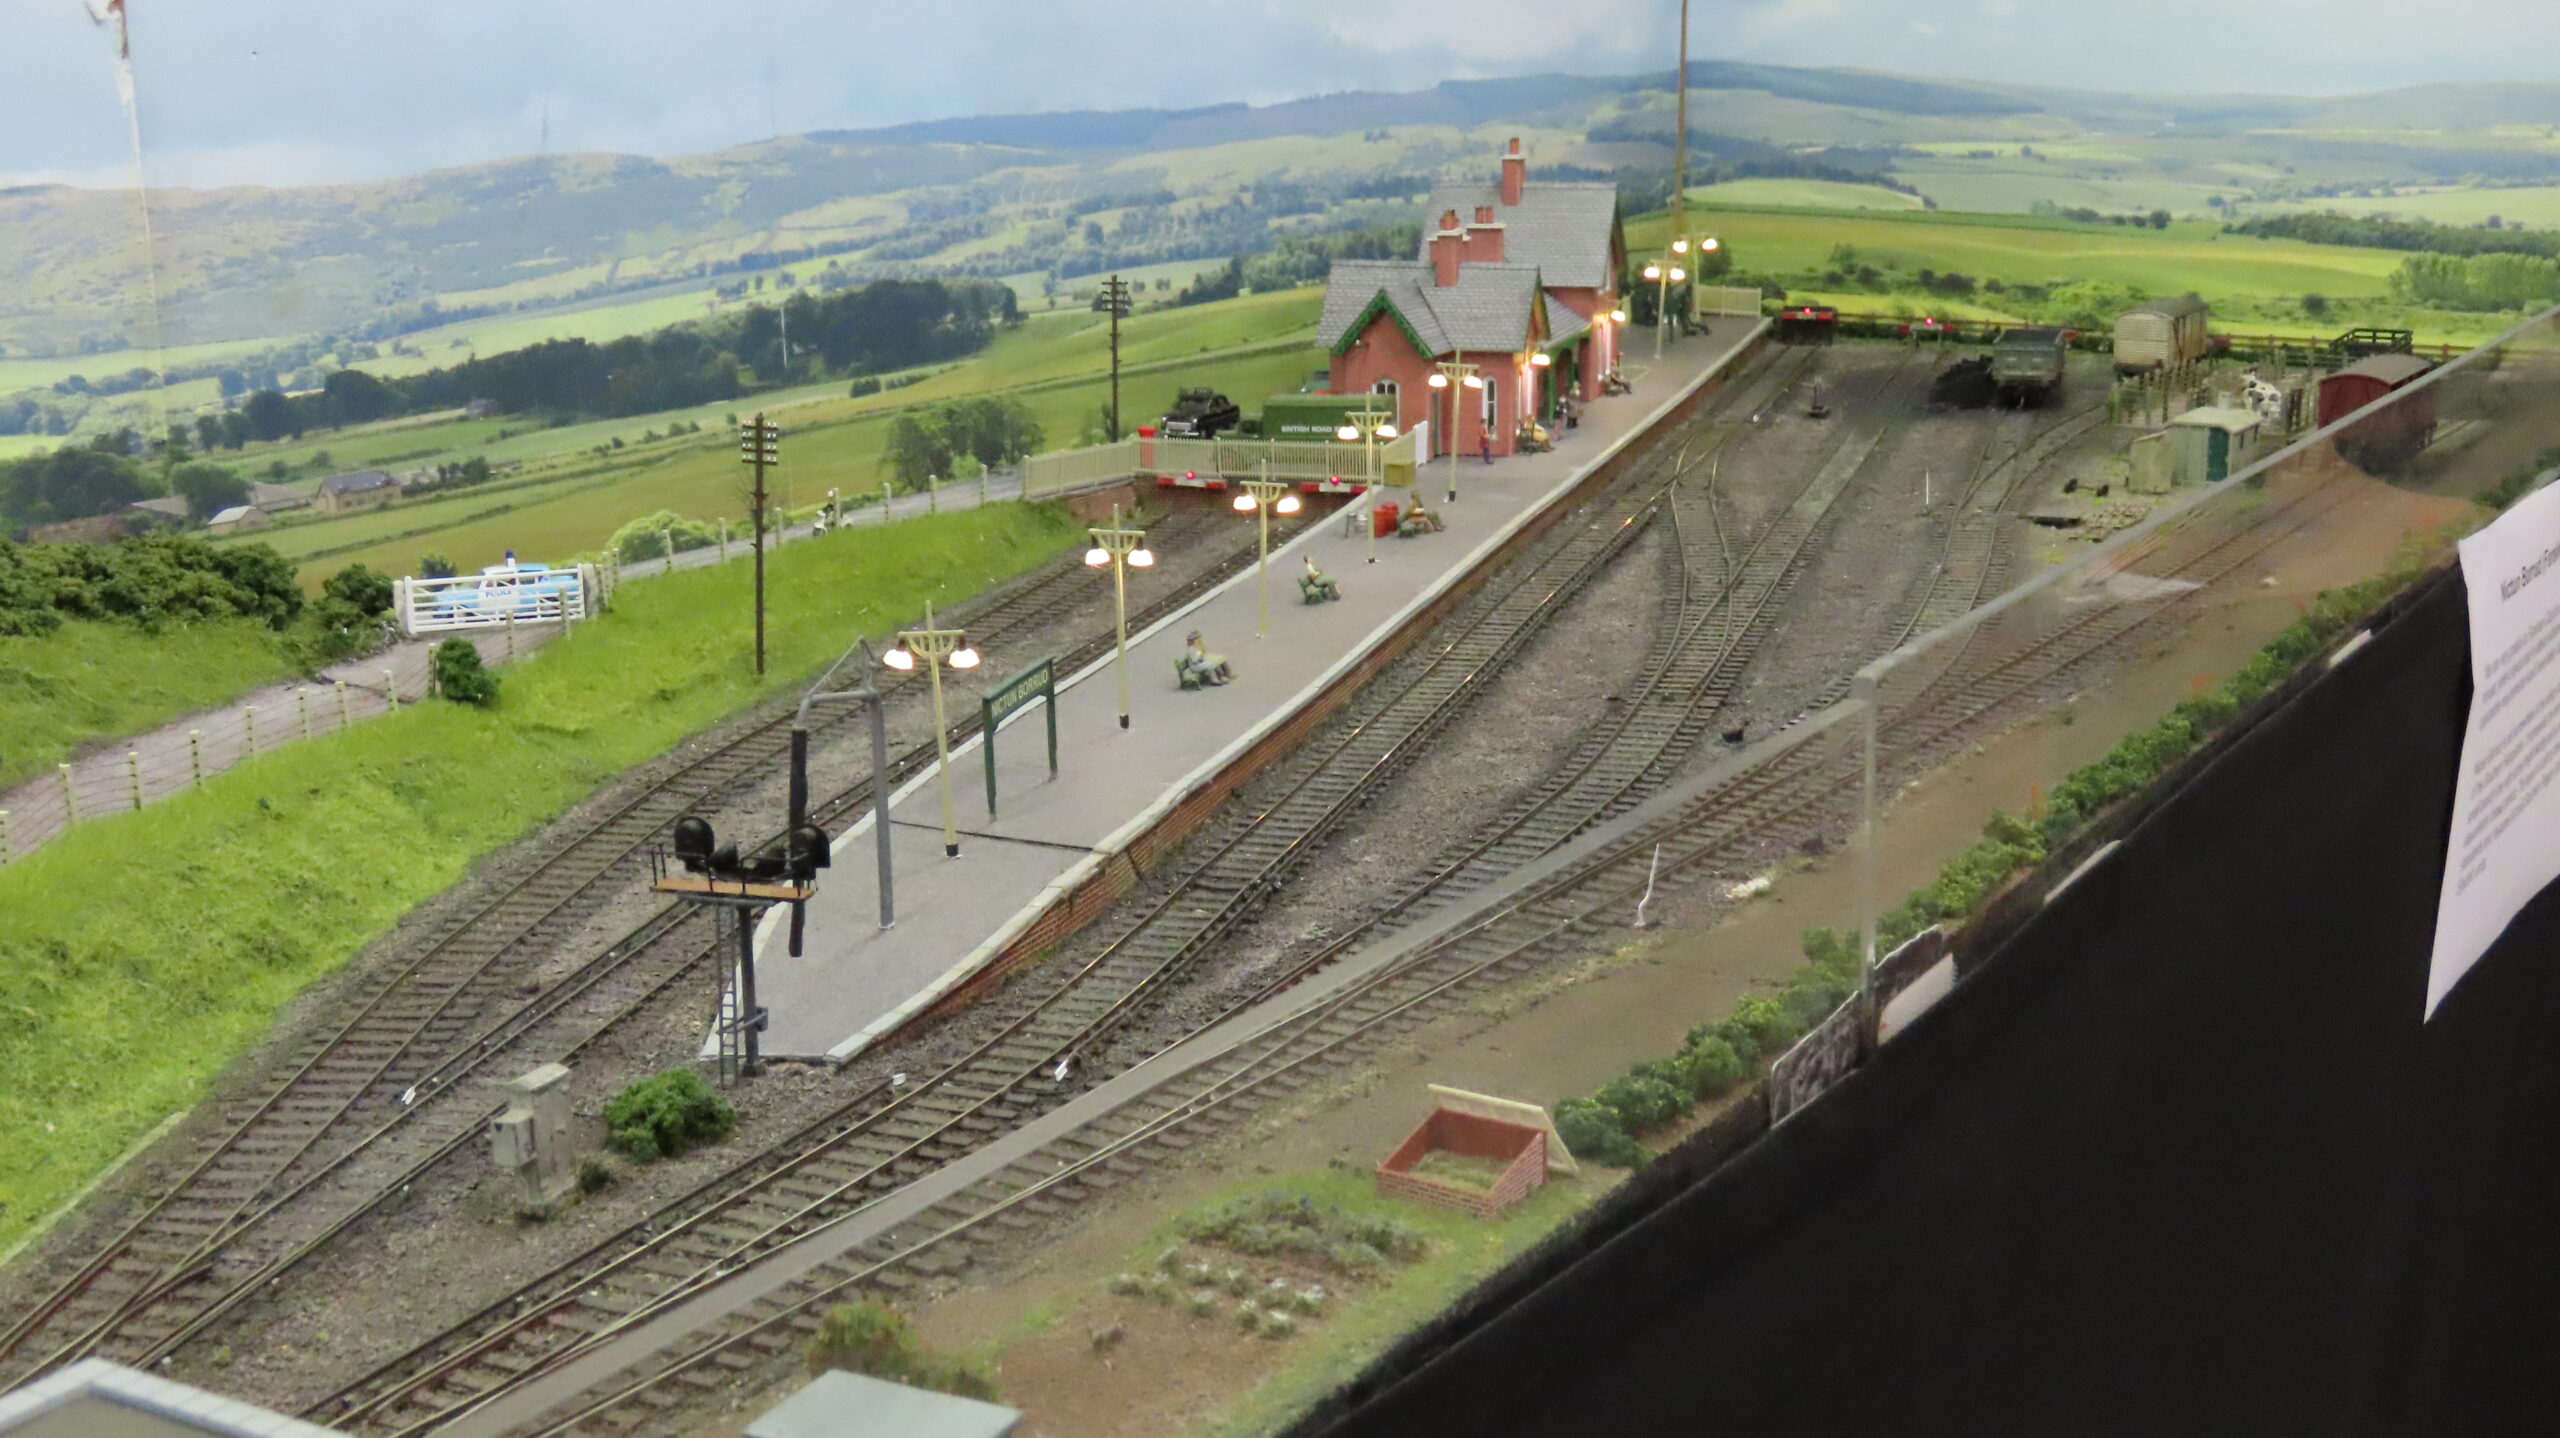
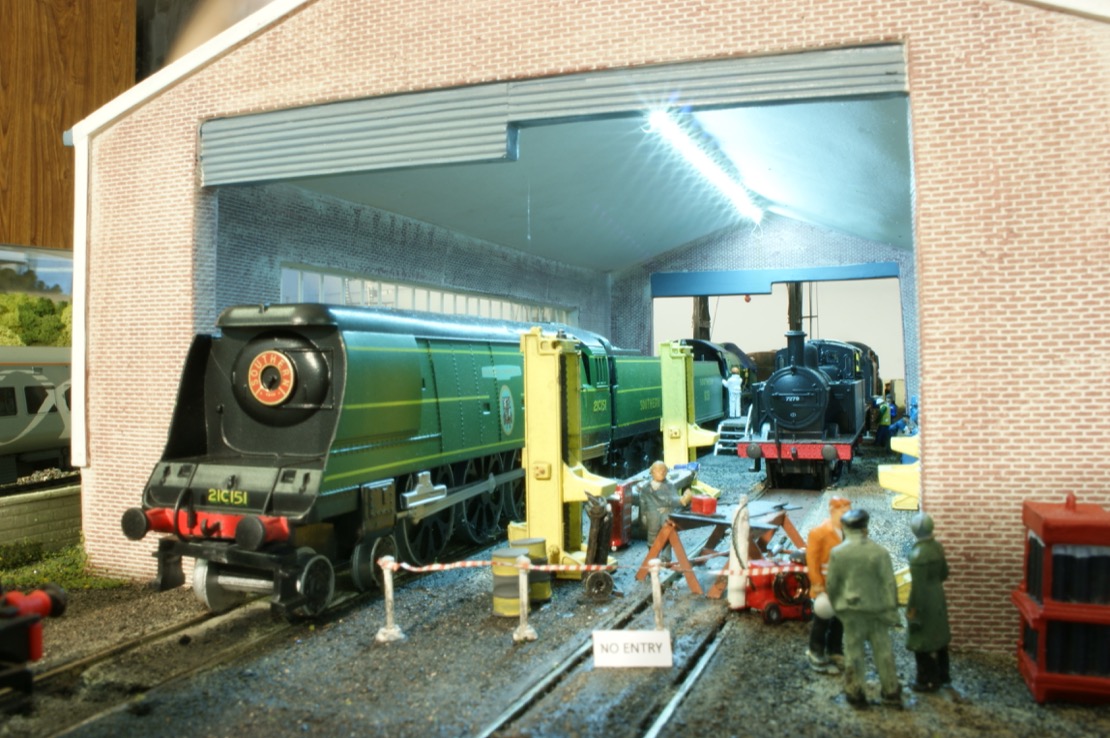
The world of model railroading is vast and diverse, with enthusiasts from every corner of the globe contributing to a rich tapestry of creativity and technical prowess. Each layout tells a unique story, whether it’s a meticulously detailed recreation of a historical scene, a bustling urban landscape, or a tranquil countryside. In this final article of the series, we’ll take a journey around the world, showcasing some of the most inspiring and innovative model railway designs. These exemplary layouts highlight the skills and dedication of their creators and provide a wealth of ideas and inspiration for your projects.
We’ll explore a variety of layouts that differ in scale, theme, and complexity, each offering distinct features that make them stand out. From intricate track plans and sophisticated scenery to advanced Technology and authentic detailing, these designs push the boundaries of what can be achieved in model railroading. Whether you’re looking to incorporate new techniques into your layout or simply seeking motivation to start your next project, these featured designs will spark your creativity and fuel your passion for model railroading.
Featured Model Railway Designs
1. The Great Model Railway Challenge: UK.
The Great Model Railway Challenge showcases the best of British model railroading. Teams of enthusiasts compete to create the most impressive layouts within a limited time frame.
Highlights: Innovative use of space, creative themes, and detailed scenery. Each layout is a testament to teamwork and ingenuity.
Takeaway: Consider participating in local or online competitions to push your creative boundaries and gain new ideas.
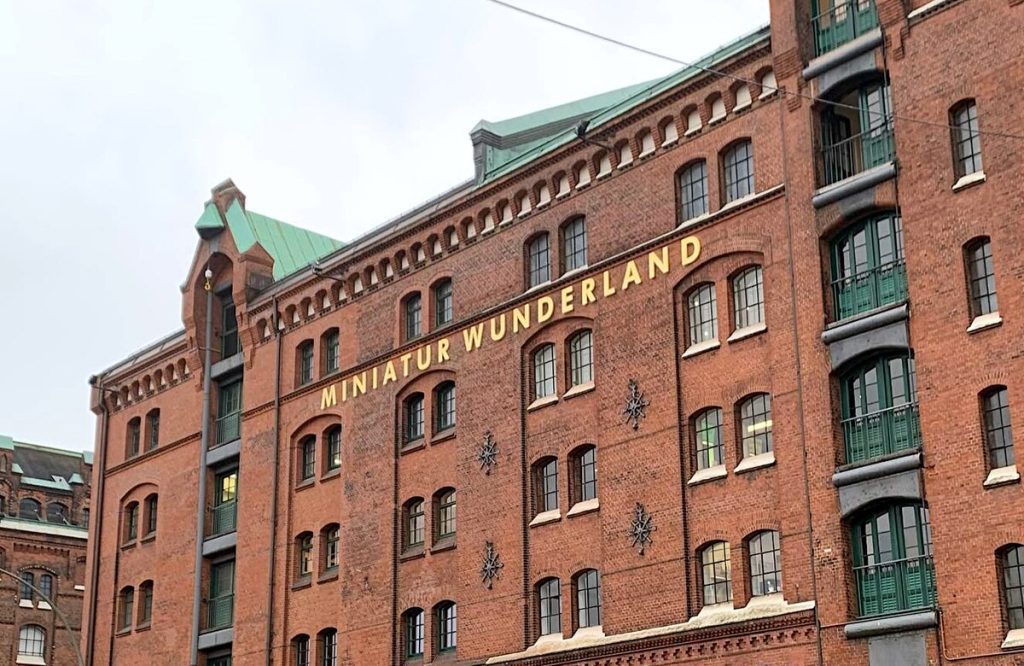
2. Miniatur Wunderland: Germany.
Located in Hamburg, Miniatur Wunderland is the world’s largest model railway exhibition, drawing millions of visitors annually.
Highlights: Over 1,500 square meters of intricately detailed landscapes, including sections dedicated to different countries and famous landmarks. Features advanced automation and lighting effects.
Takeaway: Large-scale projects can create immersive experiences. Incorporate automated elements and lighting to add dynamism to your layout.
3. The Layout at Kaeselare: Belgium.
This private layout, inspired by the Belgian countryside, showcases the beauty of rural railroading.
Highlights: Realistic scenery with detailed farms, fields, and small villages. Authentic rolling stock and meticulous attention to detail in buildings and vegetation.
Takeaway: Focus on a specific theme or region to create a cohesive and realistic layout. Pay attention to small details to enhance authenticity.
4. Northlandz: USA
Northlandz in Flemington, New Jersey, is one of the largest model railroads in the United States.
Highlights: Massive and complex track systems, with over eight miles of track spanning vast mountainous terrain and detailed urban areas.
Takeaway: Ambitious projects with extensive track layouts can create awe-inspiring results. Use a variety of scenery techniques to differentiate regions within your layout.
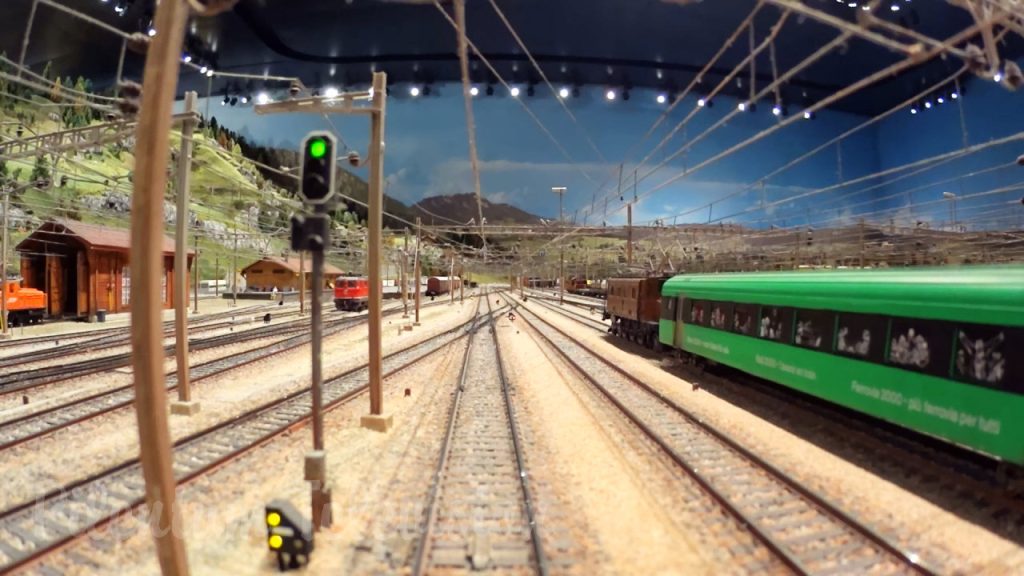
5. The Chiyoda Line: Japan.
This N-scale layout replicates Tokyo’s busy Chiyoda subway line.
Highlights: Compact yet highly detailed urban scenes, complete with working subway trains, detailed station interiors, and realistic cityscapes.
Takeaway: Urban layouts can be incredibly detailed and realistic, even on smaller scales. Focus on capturing the essence of city life and infrastructure.
6. Märklin’s Exhibition Layouts: Germany
Märklin, a renowned model railway manufacturer, often showcases impressive layouts at exhibitions worldwide.
Highlights: Professional-quality layouts demonstrating the latest model railroading Technology and design. Features include detailed European landscapes, cutting-edge digital control systems, and synchronized sound.
Takeaway: Staying updated with the latest Technology and products can significantly enhance your layout. Attend exhibitions and trade shows to see innovations first-hand.
Drawing Inspiration from These Designs.
1. Embracing Technology
Many featured layouts incorporate advanced digital control systems, automated features, and synchronized sound. Embracing these technologies can add layers of realism and operational interest to your layout.
2. Attention to Detail
The level of detail in scenery, buildings, and rolling stock sets these layouts apart. To elevate your layout’s realism, focus on small details, such as weathering, signage, and natural elements.
3. Thematic Cohesion
Each layout has a clear theme or storyline, whether a specific geographical location, historical period, or type of operation. Ensuring thematic Cohesion helps create a more immersive and believable miniature world.
4. Learning from the Best
Study the techniques and approaches used by master modellers. Many experts share their methods through books, articles, and online tutorials, providing valuable insights into advanced modelling practices.
Conclusion
Advancing your model railway layout involves combining technical skill, creative vision, and a passion for detail. You can transform your layout into a breathtakingly realistic miniature world by incorporating multi-level track plans, sophisticated scenery techniques, digital command control systems, and immersive sound integration.
Reflecting on Our Journey Through Model Railroading:
Our first article laid the foundation for creating model railway layouts, emphasizing the importance of careful planning, efficient use of space, and incorporating realistic features. We explored various layout plans and provided essential tips for beginners, ensuring that even those with limited space or experience could embark on this rewarding hobby.
Our second article explored advanced techniques, from complex track plans and multi-level layouts to detailed scenery and the integration of digital command control systems. We learned how to add dynamic elements and sounds to our layouts, making them more engaging and lifelike. These advanced methods allow enthusiasts to push the boundaries of their creativity and technical prowess, resulting in layouts that are not only visually stunning but also operationally intricate.
In this final article, we’ve been inspired by some of the most remarkable model railway designs worldwide. These layouts demonstrate the incredible potential of model railroading as an art form and a technical challenge. The diverse approaches and innovative techniques showcased here testify to what can be achieved with dedication, skill, and imagination.
As you draw inspiration from these exemplary designs, remember that model railroading is a journey. Each project, no matter how small or large, contributes to your growth as a modeller. Don’t be afraid to experiment, push boundaries, and, most importantly, enjoy the process of bringing your miniature world to life.
There’s always something new to learn and explore in the vast and varied world of model railroading. Let these inspiring layouts be a testament to what can be achieved with passion, patience, and creativity. Happy modelling, and may your trains always run on time!
Embarking on the journey of building a model railway layout is a thrilling experience, full of creativity and meticulous planning. After mastering the fundamental aspects of model railway design, enthusiasts often seek to elevate their layouts to new heights, incorporating more intricate and sophisticated elements. This is where advanced techniques come into play, transforming a basic setup into a highly detailed and dynamic miniature world that captures the imagination.
In this article, we delve into advanced model railway techniques. We’ll explore complex track plans that introduce operational complexity and realism, advanced scenery methods that breathe life into your landscapes, and cutting-edge digital control systems that offer precise train management. Additionally, we’ll cover the integration of sound to create an immersive auditory experience. Whether you aim to recreate bustling urban environments, tranquil rural scenes, or expansive industrial areas, these advanced techniques will help you achieve greater detail and functionality.
This guide provides a comprehensive overview of the tools, techniques, and tips needed to enhance your model railway layout. It is for seasoned hobbyists looking to refine their skills or novices ready to take on a more ambitious project. Let’s dive into the fascinating world of advanced model railway design and discover how to bring your miniature trainscape to life with realism and flair.
Complex Track Plans
1. Multi-Level and Helix Layouts
Adding multiple levels to your layout can dramatically increase the complexity and realism of your model railway. A helix is a spiral track that connects different levels, allowing trains to ascend or descend between them seamlessly.
Design Tips: Ensure the helix has a gentle gradient (2-3%) to prevent strain on the locomotives.
Space Considerations: Helixes require significant vertical space; plan accordingly.
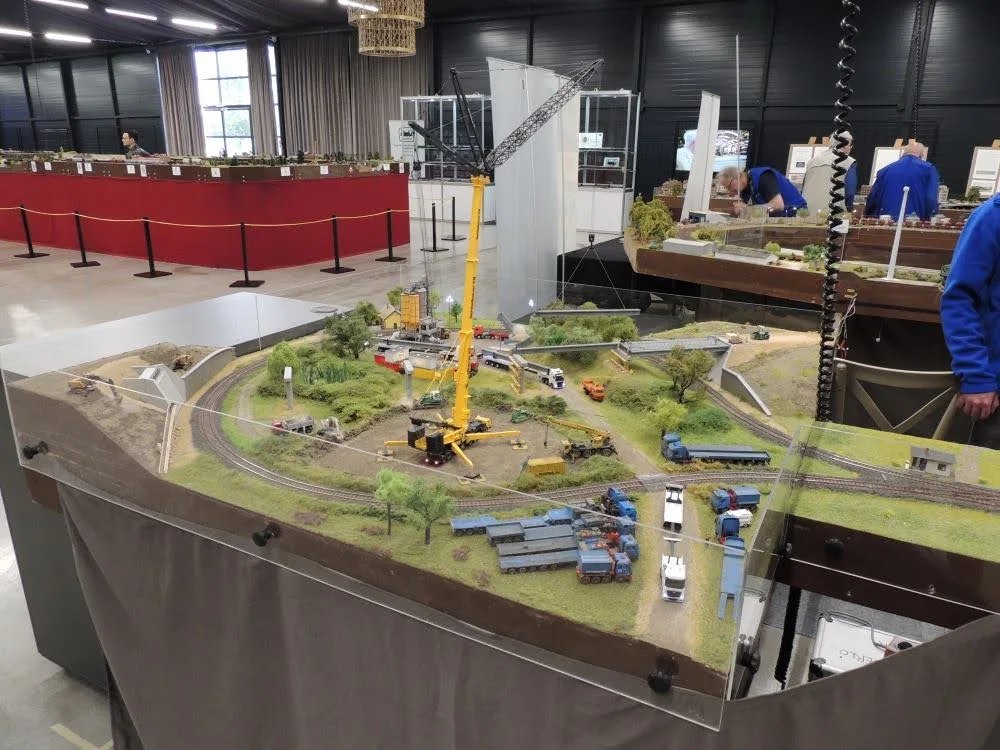
2. Yard and Industrial Areas
Yard and industrial areas add operational interest and realism.
Switching Yards: Design these areas for shunting and sorting of cars. Include various tracks for arrivals, departures, and storage.
Industrial Sidings: Add sidings that serve factories, warehouses, and other industries. This adds purpose to your freight operations.
Sample Complex Track Plan
Advanced Scenery Techniques
1. Realistic Water Features
Creating realistic water features can be challenging but rewarding.
Materials: Using resin or acrylic water products creates rivers, lakes, and ponds.
Detailing: Add rocks, plants, and small animals to the water’s edge for realism.
2. Advanced Terrain Modeling
Go beyond basic hills and valleys by incorporating detailed terrain features.
Rock Formations: Carve realistic rock faces using plaster or foam. Paint shades of grey, brown, and green to mimic natural rock.
Ground Cover: Mix static grass, fine turf, and natural soil to create a varied and realistic ground cover.
3. Seasonal Effects
Modelling different seasons can add unique character to your layout.
Winter Scenes: Use baking soda or specialized snow products to create snow-covered landscapes. Add ice effects with clear resin.
Autumn Scenes: To create a fall atmosphere, mix orange, red, and yellow foliage—scatter fallen leaves made from finely chopped coloured paper or commercial products.
Digital Command Control (DCC)
1. Introduction to DCC
Digital Command Control (DCC) allows for more precise and flexible control of your trains.
Benefits: Run multiple trains independently on the same track, control lights and sounds, and automate complex operations.
Equipment: You’ll need a DCC system, decoders for each locomotive, and possibly boosters for larger layouts.
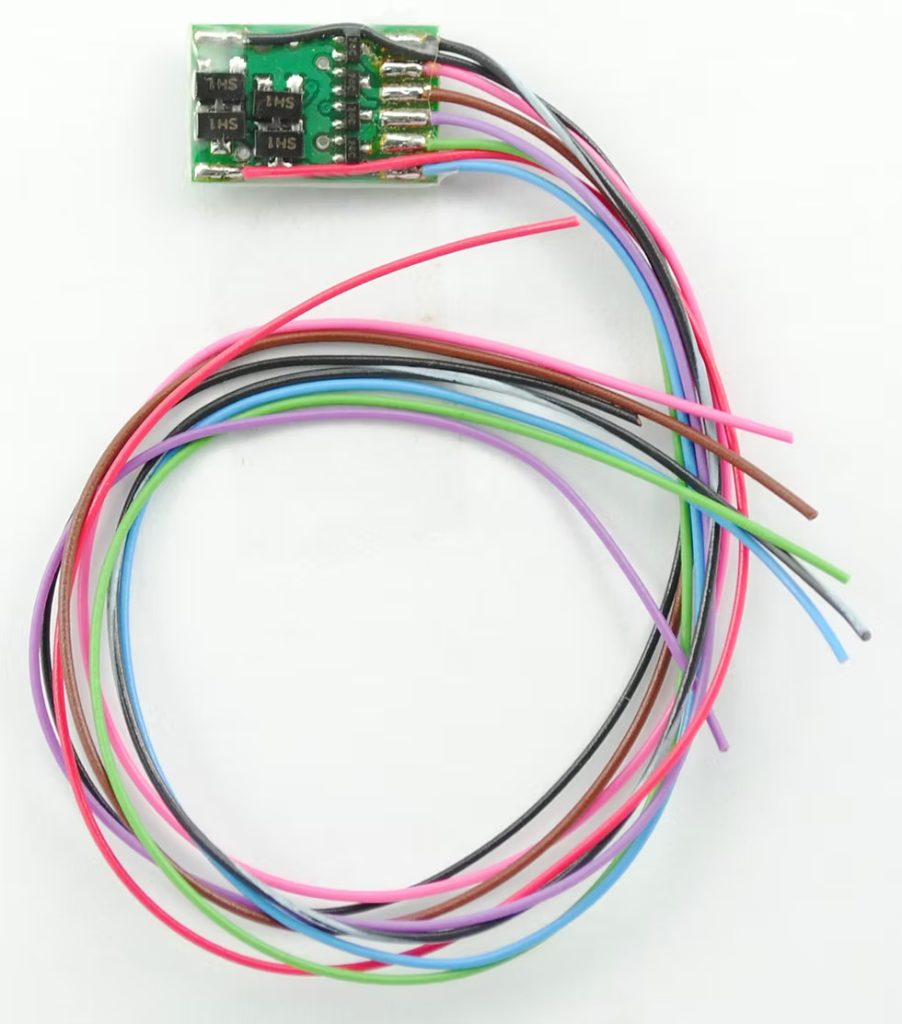
2. Installing Decoders
Installing decoders in your locomotives can be straightforward or complex, depending on the model.
Basic Installation: Many modern locomotives are DCC-ready, meaning you only need to plug in the decoder.
Advanced Installation: Older or non-DCC-ready models may require soldering and modifications to the internal wiring.
3. Programming and Operation
Once installed, decoders need to be programmed.
Addresses: Assign a unique address to each locomotive for individual control.
Functions: Program lighting effects, sound functions, and speed settings to match your preferences.
Sound Integration
1. Sound Decoders
Adding sound decoders can bring your model railway to life.
Locomotive Sounds: Choose decoders that provide realistic engine sounds, whistles, horns, and brake squeals.
Installation Tips: Ensure your locomotive has enough space for the speaker. Some models may require modifications.
2. Ambient Sounds
Enhance the atmosphere with ambient sounds.
Station Announcements: Add recordings of station announcements, crowd noises, and other sounds to your station areas.
Nature Sounds: Use sound modules to add bird songs, water sounds, and other natural effects to your scenic areas.
3. Synchronizing Sound and Movement
Ensure that the sound effects are synchronized with the movement of your trains.
Speed Matching: Adjust the speed settings of your decoders to match the sound effects.
Event Triggers: Use sensors and triggers to activate sounds based on train movements or positions.
Conclusion
Advancing your model railway layout involves a blend of technical skill, creative vision, and a passion for detail. By incorporating multi-level track plans, sophisticated scenery techniques, digital command control systems, and immersive sound integration, you can transform your layout into a breathtakingly realistic miniature world.
Imagine watching your trains navigate complex helixes, winding through meticulously crafted landscapes, with the sounds of engines chugging and birds singing in the background. The yards and industrial areas bustle with activity, adding layers of operational interest. Each train journey is an immersive experience, engaging the eyes and ears, creating a living, breathing slice of the railway world.
As you embark on these advanced projects, remember that the process is as rewarding as the finished product. Each step, from installing a decoder to painting a rock face, adds to your skills and deepens your appreciation for this intricate hobby. Feel free to experiment and push the boundaries of what your layout can achieve.
Stay tuned for our next article, where we’ll showcase inspiring model railway designs worldwide. These examples will provide further ideas and motivation and demonstrate the incredible potential of advanced model railway techniques. Happy modelling, and may your trains always run on time!
Stay Tuned:
Article 1: The first Article
Article 3: Showcasing Inspiring Model Railway Designs from Around the World
The landscape of hobbyist model building has experienced a profound transformation with the advent of 3D printing and laser-cut kits. These technologies have revolutionised the way enthusiasts approach the creation of custom models and structures, enabling unprecedented levels of detail, customisation, and creativity. From intricate architectural models to personalised figurines, 3D printing and laser cutting possibilities are limitless. This article explores how these technologies are used in model building, their advantages, and the prospects of this exciting trend, inspiring and exciting hobbyists and enthusiasts.
The Technological Revolution in Model Building
Traditional methods of model building, which often involved meticulous handcrafting and the assembly of pre-manufactured components, have been significantly augmented by modern technologies. 3D printing and laser cutting represent the pinnacle of this technological evolution, each bringing unique strengths to the table.
3D Printing: Precision and Customization
3D printing, or additive manufacturing, creates objects layer by layer from a digital file. This technology allows for creating highly detailed and complex models that would be difficult, if not impossible, to achieve through traditional methods.
One of the primary advantages of 3D printing in model building is the ability to produce highly customised parts. Enthusiasts can design their own models using CAD (Computer-Aided Design) software, tailoring every aspect to their specific needs. This level of customisation is particularly valuable in hobbyist communities such as model railroading, where unique structures, vehicles, and landscapes can significantly enhance the realism and individuality of a layout, fostering a sense of connection and engagement.
For example, a model railroader can design and print custom buildings replicating structures from their local area or historical period. This adds a personal touch to their layout and allows for a more immersive experience. Additionally, 3D printing enables the production of small, detailed parts that might be too fragile or intricate to create by hand. This includes miniature figures, intricate architectural details, and unique terrain features.
Laser Cutting: Precision and Efficiency
Laser cutting complements 3D printing by providing a method for creating precise and detailed flat components quickly and efficiently. Laser cutters use a focused beam of light to accurately cut through materials such as wood, acrylic, and cardboard. This technology is particularly well-suited for creating structural components, such as walls, floors, and intricate building facades.
One significant advantage of laser cutting is quickly producing multiple identical parts. This is particularly useful for model builders who must create repetitive elements, such as the walls of a large structure or multiple identical vehicles. Laser-cut kits can also include detailed engraving, adding texture and depth to surfaces in a way that would be challenging to achieve through manual methods.
Applications in Model Railroading
Model railroading is one of the hobbies that has most enthusiastically embraced 3D printing and laser cutting. These technologies have opened new possibilities for creating realistic and customised layouts.
Buildings and Structures
One of the most popular applications of 3D printing and laser cutting in model railroading is the creation of buildings and structures. With 3D printing, hobbyists can design and produce highly detailed and accurate models of real-world buildings. This allows replicating specific architectural styles, historical landmarks, and unique local structures. For instance, a model railroader can create a miniature version of a local train station with all the architectural details and historical features.
Laser-cut kits are also widely used to create building components. These kits often include precisely cut pieces of wood or acrylic that can be assembled to form detailed structures. The precision of laser cutting ensures that all parts fit together perfectly, resulting in a professional-quality model. Additionally, laser-cut kits can be customised to include specific details and features, allowing hobbyists to create unique buildings that match their vision.
Rolling Stock and Vehicles
3D printing has also revolutionised the creation of rolling stock and vehicles in model railroading. Hobbyists can design and print custom locomotives, freight cars, passenger cars, and other vehicles. This allows for a high level of customisation, enabling modellers to create unique rolling stock that matches their specific era, location, and style.
For example, a model railroader can design a custom locomotive based on a specific prototype with all the unique details and features. This can include everything from the shape and size of the engine to the placement of lights, vents, and other small details. 3D printing also allows for the creation of vehicles in non-standard scales or with unique modifications, providing endless possibilities for customisation.
Scenery and Terrain
Creating realistic scenery and terrain is a crucial aspect of model railroading, and 3D printing and laser cutting have made this task significantly easier and more precise. With 3D printing, hobbyists can create detailed terrain features such as mountains, cliffs, and rock formations. These features can be designed to match specific geographic locations or to fit the modeller’s vision of their layout.
Laser cutting is also used to create detailed scenery elements. For example, laser-cut kits can include components for bridges, trestles, and other structural elements that add realism and complexity to a layout. These kits can be customised to match specific prototypes or to include unique details, allowing hobbyists to create highly realistic and personalised scenery.
Applications in Other Model Building Hobbies
While model railroading is a significant application, 3D printing and laser cutting are also extensively used in other model-building hobbies. From architectural modelling to wargaming, these technologies provide hobbyists new ways to enhance their creations.
Architectural Modelling
Architectural modelling has benefited greatly from the precision and customisation of 3D printing and laser cutting. Architects and designers can create highly detailed scale models of their projects, allowing them to visualise and refine their designs. These models can include intricate details such as windows, doors, and façade elements, providing a realistic representation of the final building.
Laser-cut kits are particularly useful for creating the structural components of architectural models. These kits can include precisely cut pieces of wood, acrylic, or other materials that can be assembled to form the building’s framework. The precision of laser cutting ensures that all parts fit together perfectly, resulting in a professional-quality model.
The Advantages of 3D Printing and Laser Cutting
3D printing and laser cutting in model building offer several significant advantages, making these technologies increasingly popular among hobbyists.
Customisation
One of the most significant advantages of 3D printing and laser cutting is the ability to create highly customised models. These technologies allow hobbyists to design and produce unique components that match their needs and vision. This level of customisation is particularly valuable in hobbies such as model railroading and wargaming, where unique and personalised elements can significantly enhance the overall experience.
Precision and Detail
3D printing and laser cutting offer high precision and detail, allowing hobbyists to create intricate and accurate models. This is particularly important in hobbies requiring small, detailed components, such as railroading and architectural modelling. The precision of these technologies ensures that all parts fit together perfectly, resulting in professional-quality models.
Efficiency and Speed
3D printing and laser cutting can significantly reduce the time and effort required to create detailed models. With these technologies, hobbyists can produce multiple identical parts quickly and efficiently, allowing them to focus on other aspects of their projects. This is particularly useful for creating repetitive elements, such as the walls of a large structure or multiple identical vehicles.
Accessibility
The increasing availability and affordability of 3D printers and laser cutters have made these technologies more accessible to hobbyists. This has opened up new possibilities for model building, allowing enthusiasts of all skill levels to create highly detailed and customised models. Additionally, the growing community of hobbyists using these technologies has developed a wealth of online resources, including tutorials, forums, and design files, making it easier to get started with 3D printing and laser cutting.
Challenges and Considerations
While 3D printing and laser cutting offer many advantages, there are also some challenges and considerations to consider.
Learning Curve
Both 3D printing and laser cutting require some level of technical knowledge and skill. Hobbyists need to learn to use CAD software to design their models and understand the technical aspects of operating a 3D printer or laser cutter. While many online resources are available to help with this, it can still be a significant investment of time and effort.
Material Considerations
The choice of materials is an important consideration when using 3D printing and laser cutting. Materials have different properties, and hobbyists must choose the right material for their project. For example, certain types of plastic may be more suitable for 3D printing small, detailed parts, while wood or acrylic may be better suited for laser-cutting structural components.
Cost
While the cost of 3D printers and laser cutters has decreased significantly in recent years, these technologies still represent a significant investment. Additionally, the cost of materials and maintenance can add up over time. Hobbyists must consider these costs when deciding whether to invest in 3D printing or laser-cutting equipment.
Future Prospects
The future of 3D printing and laser cutting in model building looks bright, with continued technological advancements and increasing accessibility. As these technologies become more sophisticated and affordable, the possibilities for creating highly detailed and customised models will continue to expand.
Technological Advancements
Ongoing advancements in 3D printing and laser-cutting technology will likely lead to even greater precision, speed, and efficiency. New materials are also being developed, offering hobbyists a wider range of project options. For example, advancements in 3D printing materials could lead to the development of more durable and flexible plastics. At the same time, improvements in laser cutting technology could allow for the cutting of even more intricate and detailed designs.
Increased Accessibility
As the cost of 3D printers and laser cutters decreases, these technologies will become even more accessible to hobbyists. This will likely lead to a growing community of enthusiasts using these technologies, further driving innovation and creativity in model building. Additionally, the increasing availability of online resources, such as design files and tutorials, will make it easier for hobbyists to start with 3D printing and laser cutting.
Conclusion
3D printing and laser-cut kits have revolutionised the model-building world, offering hobbyists new ways to enhance their creations with unprecedented detail, customisation, and precision. From model railroading to architectural modelling and wargaming, these technologies have created new possibilities for creating unique and realistic models. While there are some challenges and considerations to remember, the advantages of 3D printing and laser cutting make them valuable tools for any model-building enthusiast. With continued technological advancements and increasing accessibility, the future of 3D printing and laser cutting in model building looks bright, promising even more exciting possibilities for hobbyists worldwide.
One of the simplest ways to keep your model railway running smoothly is also one of the most overlooked: track cleaning. Over time, even the most meticulously built layouts can suffer from dirt, dust, and oxidation, all of which lead to poor electrical contact, stuttering locomotives, and frustrating running sessions.
Luckily, there are plenty of tried-and-tested methods for keeping your rails in top condition. Whether you’re after a quick tidy-up or a deep clean, this guide covers everything you need to know.
1. Manual Cleaning: The Old Faithful
Sometimes, the basics are best.
Track rubbers (like those from Peco or Gaugemaster) are a go-to tool. Gently rub them along the rails to remove dirt, grime, and mild oxidation.
For a softer touch, a wine cork or a block of Masonite works well for general cleaning without scratching the rail.
A microfiber cloth, slightly dampened with a cleaning solution, can be used to wipe down the rails regularly.
Pros: Simple, cheap, and effective Cons: Time-consuming on larger layouts, and track rubbers can be a bit abrasive over time
2. Chemical Cleaning: For a Deeper Shine
If the grime is more stubborn, it’s time to bring in the cleaning fluids.
Isopropyl alcohol (IPA), ideally 70–99%, is a popular choice. Apply it with a cloth or cotton bud for great results.
WD-40 Contact Cleaner (not the regular stuff) is safe for electrical use and effective at breaking down grease and grime.
Some modelers swear by lighter fluid (naphtha)—just be sure to use it in a well-ventilated area and with care.
Pros: Powerful and thorough Cons: Flammable and requires careful handling
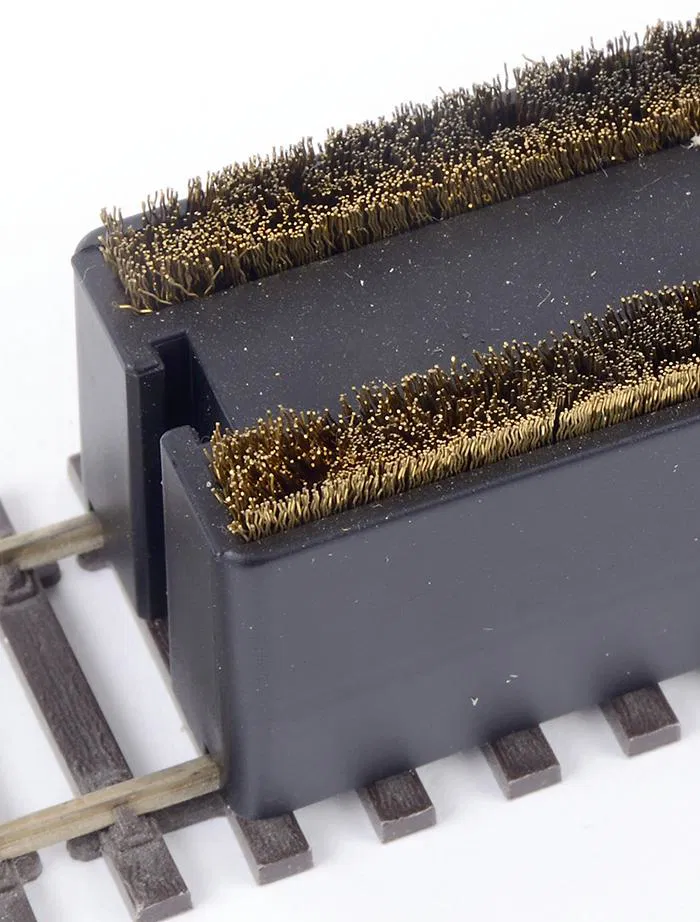
3. Track-Cleaning Wagons: Clean as You Run
Why not let your trains do the hard work?
Brands like Dapol and CMX make rail-cleaning wagons that either drag an abrasive pad or dispense cleaning fluid as they go.
For a DIY option, attach a microfiber pad under a wagon using a bit of weight and a Velcro strip. It’s surprisingly effective.
Pros: Clean the rails while you run trains—what’s not to like? Cons: Doesn’t replace deep cleaning, especially for oxidized rails
4. Abrasive Methods: A Last Resort
For badly oxidized or painted rails, you might need to go in hard.
Fiberglass pens or ultra-fine sandpaper (1000 grit) can remove corrosion.
Be careful—these methods can wear down the rail surface over time and should only be used when necessary.
Pros: Effective on heavy oxidation or stubborn residue Cons: Can scratch and damage rails if overused
5. Prevention Is Better Than Cure
Regular maintenance means less scrubbing later.
Keep your layout area dust-free—a cover or regular cleaning can make a big difference.
Clean loco and rolling stock wheels regularly. Dirty wheels will just spread grime back onto clean track.
Store trains properly when not in use to reduce dust buildup.
In Summary
There’s no single “best” way to clean your model railway track—it depends on how dirty things have gotten and how often you maintain it. Here’s a quick cheat sheet:
Method
Best For
Caution Needed?
Manual (Track Rubber)
Everyday cleaning
Light abrasiveness
Chemical (IPA etc.)
Grease, oil, and oxidation
Use safely
Cleaning Wagons
Maintenance during operation
Won’t fix corrosion
Abrasives (Sandpaper)
Oxidation and paint
Use sparingly
Regular cleaning will keep your layout running smoothly and looking great, saving you frustration and keeping your engines purring along the rails.
In this series of three articles we are going to discus designing layouts, more advanced items to consider and layouts that you could use for inspiration each article focuses on on a specific element and is designed for you to read in just a few minutes to give you some drive to begin your project.
Creating a model railway layout is a captivating hobby that combines creativity, engineering, and a love for trains. The allure of designing a miniature world, where every detail from the track layout to the smallest element of scenery can be controlled and customised, is a significant part of what makes model railroading so enchanting. Whether you’re a seasoned enthusiast or a newcomer to model railways, designing and building your own layout can be challenging and rewarding.
In this article, we’ll journey through the fundamental aspects of model railway design. We’ll explore a variety of layout plans that cater to different space constraints and preferences, complete with layout diagrams to spark your imagination. You’ll learn valuable tips for efficiently utilising your available space, ensuring that even the smallest area can be transformed into a bustling railway scene. Additionally, we’ll delve into the art of incorporating realistic features into your layout, such as lifelike scenery, detailed buildings, and authentic rolling stock, all of which add to the immersive experience of your model railway.
This guide will help to inspire and assist you in creating a model railway that reflects your vision and passion. From initial planning to the final touches, we’ll provide you with the knowledge and ideas needed to bring your miniature railway to life. Whether you aim to recreate a specific historical era, depict a bustling urban environment, or capture the tranquillity of a rural landscape, the tips and techniques discussed here will help you achieve your goals.
Join us as we uncover the secrets to creating stunning model railway layouts. We offer insights that will elevate your modeling skills and bring your railway dreams to fruition. Let’s start this exciting adventure into the world of model railroading!
Layout Planning and Design
1. Understanding Your Space
Before diving into the design, evaluate the space available for your model railway. Consider the following factors:
Room Dimensions: Measure the space’s length, width, and height.
Accessibility: Ensure you can easily access all parts of the layout for maintenance and operation.
Lighting and Power: Plan for adequate lighting and power outlets.
2. Choosing a Scale and Gauge
The scale (the proportion of the model to the real thing) and gauge (the distance between the rails) are crucial decisions:
HO Scale (1:87): Popular and versatile, suitable for detailed layouts.
N Scale (1:160): Ideal for limited space, allowing for larger layouts in smaller areas.
O Scale (1:48): Larger scale, great for detail, but requires more space.
3. Developing a Track Plan
A well-thought-out track plan is the backbone of any model railway:
Continuous Loop: Perfect for beginners, offering simple operation and constant running.
Point-to-Point: More realistic operations with a defined start and end point.
Switching Layout: Focuses on industrial or yard operations, ideal for small spaces.
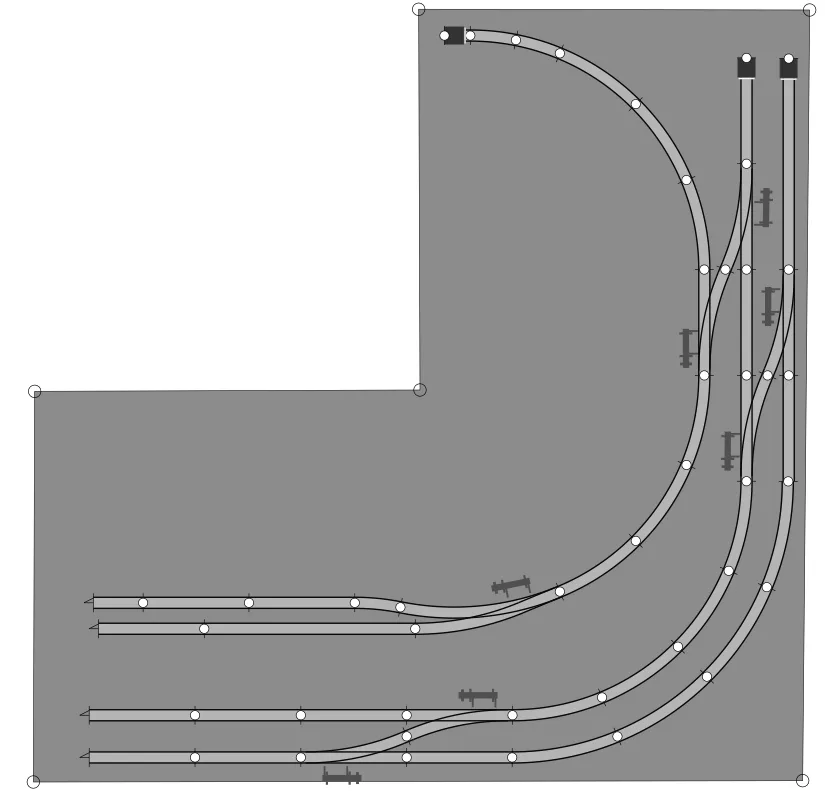
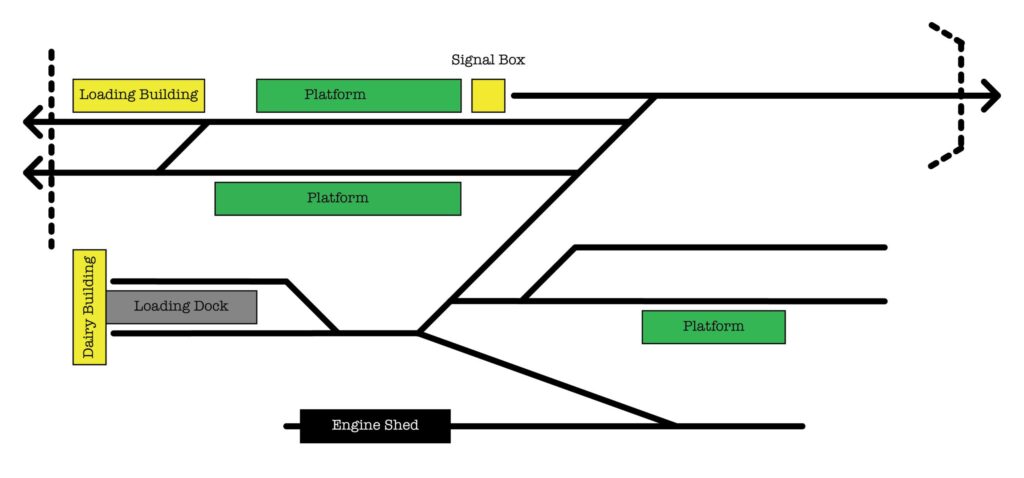
Sample Layout Diagram
Below we have provided an example of one of our own track diagrams Fairhaven Town. This gives you an idea of the kind of basic items that you should include on your diagram such as buildings turnouts tunnels and so on.
By doing this, it will give you a good idea of what you might be able to include in the space you have on your board.
Efficient Use of Space
1. Multi-Level Layouts
Maximize vertical space by incorporating multi-level layouts. Use helixes or ramps to connect different levels, allowing for longer runs and more scenery.
2. Modular Layouts
Consider modular designs that can be expanded or reconfigured. This approach is handy for those with limited space or who may move in the future.
3. Fold-Up or Portable Layouts
For those with minimal space, fold-up or portable layouts provide a practical solution. These can be stored away when not in use and set up quickly.
Incorporating Realistic Features
1. Scenery and Landscaping
Creating realistic scenery enhances the overall appearance of your layout:
Terrain: Use foam, plaster, or paper mache to create hills, mountains, and valleys.
Vegetation: Trees, bushes, and grass can be made from a variety of materials, including commercial products and natural items like twigs and moss.
Water Features: Realistic rivers, lakes, and waterfalls can be created using resin or other water-simulation products.
2. Buildings and Structures
Adding buildings and structures brings life to your layout:
Scratch-Built: Custom buildings made from basic materials provide a unique touch.
Kits: Pre-fabricated kits are available in various styles and levels of complexity.
Detailing: Add small details like signage, weathering, and interior lighting to enhance realism.
3. Rolling Stock and Locomotives
Ensure your trains fit the era and location you’re modelling:
Weathering: Use paint and powders to simulate dirt, rust, and wear.
Detailing: Add small details like figures, cargo, and decals to rolling stock and locomotives.
Tips for Beginners
1. Start Small
Begin with a simple layout and expand as your skills and confidence grow. A small project is less overwhelming and allows you to focus on learning the basics.
2. Learn from Others
Join model railway clubs, attend exhibitions, and participate in online forums. The community is a valuable resource for advice, inspiration, and support. If you want to learn more about joining our Fareham Model Railway Club, you can follow This Link to post an enquiry.
3. Have Patience
Building a model railway takes time and effort. Enjoy the process, and don’t rush. Each step, from planning to construction, is part of the rewarding journey.
Conclusion
Designing and building a model railway layout is a fulfilling hobby that offers endless possibilities for creativity and enjoyment. By carefully planning your layout, efficiently using space, and incorporating realistic features, you can create a miniature world that captures the magic of railways. The next articles will delve deeper into specific layout ideas, advanced techniques, and more tips to elevate your model railway to the next level. Happy modelling!
Stay Tuned More Articles On This Are Coming Soon
Article 2: Advanced Techniques for Model Railway Layouts
Article 3: Showcasing Inspiring Model Railway Designs from Around the World
Model trains are a captivating hobby that allows enthusiasts to combine their love for railways with creativity and technical skills. Whether you’re a beginner just starting out or an experienced modeller looking to expand your collection, understanding the different brands and their offerings is essential. Scenery is only part of providing realism, so it’s crucial to have locos that fit your layout. The level of detail and weathering that can be achieved can make locos look truly unique. In this guide, we’ll delve into some of the prominent brands in the model train industry—Bachmann, Hornby, and Dapol. We’ll provide an overview of their products, reviews, comparisons, and recommendations suitable for all levels of expertise.
Bachmann: Innovation and Variety
Overview
Bachmann is known for its wide range of model trains and accessories, catering to various scales, including HO, N, and OO. The brand is celebrated for its detailed locomotives, high-quality rolling stock, and innovative features.
Popular Products
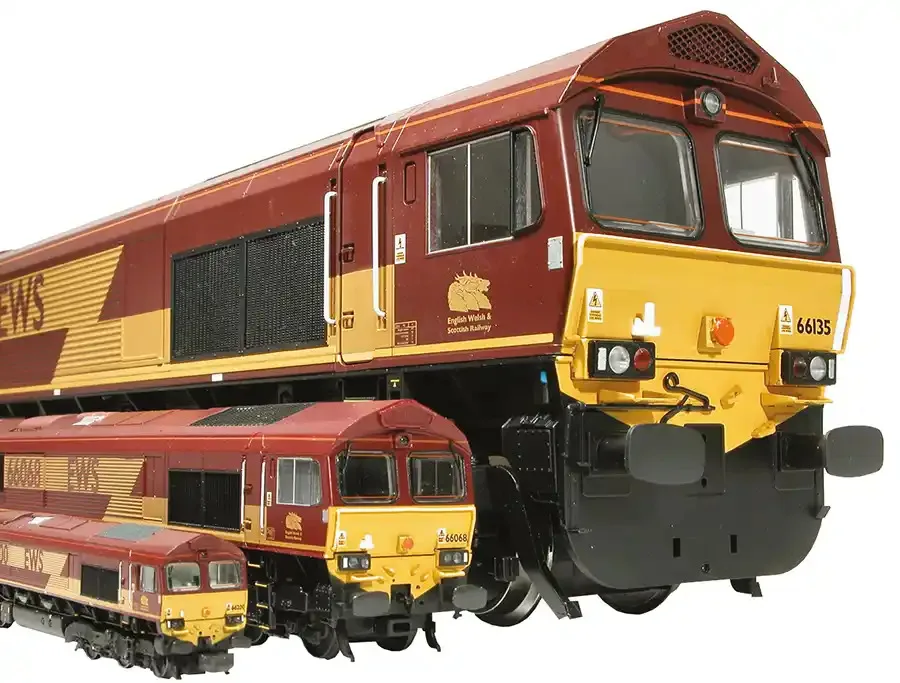
Bachmann Class 66 (HO Scale) – Known for its intricate detailing and smooth operation, the Class 66 – is a favourite among HO scale modellers.
Bachmann Spectrum Line This premium line offers enhanced detailing and performance, making it ideal for serious hobbyists.
Reviews
Locomotives – Bachmann’s locomotives receive high praise for their durability and realism. The DCC (Digital Command Control) ready models are particularly appreciated for their ease of use and adaptability.
Wagons and Carriages – Users commend the variety and authenticity of Bachmann’s rolling stock. The coupling system is user-friendly, and the build quality ensures longevity.
Recommendation
Bachmann is a great choice for both beginners and advanced modellers. Beginners will find the ready-to-run sets and easy-to-install DCC systems helpful, while advanced hobbyists can enjoy the detailed models and wide variety of available accessories.
Hornby: Heritage and Quality
Overview
Hornby is a British brand with a rich history in model railroading. Specializing in OO gauge, Hornby is synonymous with high-quality models that reflect the heritage of British railways.
Popular Products
Hornby Flying Scotsman (OO Gauge) – An iconic model that captures the essence of British steam locomotives with superb detail and performance.
Hornby RailRoad Range – Offers more affordable models without compromising on quality, perfect for beginners or those expanding their layouts economically.
Reviews
Locomotives – Hornby’s steam locomotives are particularly praised for their historical accuracy and fine detailing. The electric and diesel models are also well-regarded for their smooth running and reliability.
Wagons and Carriages – Hornby’s carriages are noted for their authentic liveries and robust construction. The coupling system is reliable, ensuring a seamless connection between cars.
Recommendation
Hornby is ideal for those who appreciate the historical aspect of railways. The RailRoad range benefits beginners, while advanced modellers will enjoy the detailed and historically accurate premium models.
Dapol: Innovation and British Excellence
Overview
Dapol, another prominent British brand, is known for its innovative approach and quality products. They produce models in OO, N, and O gauges, catering to various preferences and scales.
Popular Products
Dapol Class 68 (N Gauge): This modern locomotive is highly detailed and features excellent running characteristics, making it a favourite in N-scale modelling.
Dapol Mk3 Coaches (OO Gauge)—These coaches are popular among OO gauge enthusiasts because of their detailed interiors and accurate liveries.
Reviews
Locomotives – Dapol’s locomotives are appreciated for their precision engineering and fine details. The modern models are especially noted for their smooth operation and reliability.
Wagons and Carriages – Users praise the realism and build quality of Dapol’s rolling stock. The magnetic couplings are a standout feature, offering ease of use and reliability.
Recommendation
Dapol is an excellent choice for modellers who value innovation and quality. The magnetic coupling system might be particularly user-friendly for beginners. At the same time, advanced hobbyists will appreciate the fine detailing and robust performance of Dapol’s models.
Comparing the Brands
Quality and Detail
Bachmann and Hornby offer excellent quality and detail. Still, Hornby has a slight edge in historical accuracy, especially with British locomotives.
Dapol’s innovative features, like magnetic couplings and finely detailed modern models, stand out. Magnetic couplings are particularly good for younger enthusiasts who may find coupling and decoupling frustrating.
Ease of Use
Bachmann is very user-friendly, especially with its DCC-ready models, making it ideal for beginners.
Hornby’s RailRoad range offers an affordable entry point with reliable quality.
Dapol’s magnetic couplings simplify setup and operation, appealing to beginners and advanced users.
Variety
Bachmann offers a broad range of products across multiple scales, providing something for everyone.
Hornby focuses primarily on the OO gauge with a deep catalogue of historically accurate British models.
Dapol caters to multiple scales, focusing on modern British and European models.
Final Recommendations
For Beginners
Bachmann: Start with a ready-to-run set and explore the variety of DCC-ready models.
Hornby: The RailRoad range is a perfect starting point with affordable, high-quality models.
Dapol: Consider models with magnetic couplings for ease of use and setup.
For Advanced Modellers
Bachmann: The Spectrum line offers detailed and high-performance models.
Hornby: Explore the premium models for historically accurate and finely detailed locomotives and rolling stock.
Dapol: Advanced users will appreciate the precision engineering and innovative features in Dapol’s offerings.
In conclusion, each brand brings its unique strengths to the table, catering to different preferences and levels of expertise. Whether you are just beginning your journey into model railroading or are looking to enhance your existing collection, Bachmann, Hornby, and Dapol offer a wealth of options to explore and enjoy.
When you are looking to buy a second-hand model railway layout, it’s essential to consider several factors to ensure you’re making a good purchase. Second-hand layouts can be an excellent way to enjoy the hobby without having to make massive spend outs for your first layout. However, it is important to make sure that you understand what work might be needed to operate the layout. Here are the key things to look for:
Condition of the Layout
Track Condition: Check for rust, warping, and cleanliness. Ensure that the tracks are securely fastened and free of major defects. Scenery: Inspect the quality of the scenery, including buildings, trees, and landscape features. Look for any signs of damage or deterioration. Baseboard: Examine the baseboard’s structural integrity. It should be sturdy and free from warping cracks or water damage.
Electrical and DCC Components
Wiring: Ensure that the wiring is in good condition and correctly installed. This includes both the main power supplying the layout and the low-voltage cables operating it. The latter can be delicate, making them susceptible to breaking or disconnecting. Look for any exposed wires or loose connections. DCC System: If the layout uses a Digital Command Control (DCC) system, verify it functions correctly. DCC systems can be complicated with many features. Get the seller to explain how the controller works. Then, check the controller and any associated hardware. Lighting: Test any installed lighting to ensure it works properly. Again, these components are very delicate and can be difficult to replace if damaged.
Locomotives and Rolling Stock
Condition: Inspect locomotives and rolling stock for wear and tear. Check for missing parts, paint condition, and general operational status. Sometimes, layout sellers will sell you locos that may not be in perfect condition, but they are easy to maintain and repair if you know what you’re doing. There are a number of articles that could help you with this. If they require servicing, you might be able to negotiate the price. Compatibility: Ensure that the rolling stock is compatible with the layout’s track gauge and control system. This should be simple to check, and it would be rare for locos to be incorrect for the layout, but it is worth checking.
Track Plan and Layout Design
Design: Consider the complexity and design of the layout. Ensure it fits the available space you have before making a purchase. Documentation: Ask for any documentation or plans related to the layout design, wiring schematics, and operational notes. Remember that controllers and other equipment frequently have manuals. If the seller doesn’t have these, you can almost certainly find them online by searching for the model number and make
Operational Testing
Running Trains: If possible, run a train on the layout to test track continuity and smoothness of operation and detect any dead spots or rough sections. Look particularly at rail joints. Ideally, you want locos to run smoothly around layouts without having to touch them. This can be difficult, particularly if the layout has been stored for some time. Take note of areas where locos do not run smoothly; these may require repairs or cleaning. Turnouts and Switches: Test all turnouts and switches to ensure they operate smoothly and correctly. With turnouts, ensuring they close in each position is also essential.
Previous Ownership and Usage
History: Ask about the layout’s history, including how long it has been in use and the extent of any modifications or repairs. Reason for Selling: Understanding why the seller is parting with the layout can provide insights into its condition and potential issues. Layouts can take years to create, so parting with them is very difficult for some.
Transport and Setup
Disassembly: Determine how easy it will be to disassemble and transport the layout. Check if it is modular or requires significant effort to move. Reassembly: Consider the complexity of reassembling the layout in your space. Ensure you have the necessary tools and skills to set it up again.
Cost and Value
Price: Compare the asking price with the cost of new components and other second-hand options to ensure you are getting good value for your money. Additional Costs: Factor in any extra costs for transport, repairs, or modifications you might need to make after purchase.
In summery, by carefully evaluating these aspects, you can make an informed decision and find a second-hand model railway layout that meets your needs and provides good value. If you keep the points above in mind, you stand a better chance of getting a layout you are happy with, and that should give you hours and hours of enjoyment.
Manage Cookie Consent
We use cookies to optimize our website and our service. To help us, we would really like to collect statistical information. If you are OK with this, please click the Statistics button and save.
Functional
Always active
The technical storage or access is strictly necessary for the legitimate purpose of enabling the use of a specific service explicitly requested by the subscriber or user, or for the sole purpose of carrying out the transmission of a communication over an electronic communications network.
Preferences
The technical storage or access is necessary for the legitimate purpose of storing preferences that are not requested by the subscriber or user.
Statistics
The technical storage or access that is used exclusively for statistical purposes.The technical storage or access that is used exclusively for anonymous statistical purposes. Without a subpoena, voluntary compliance on the part of your Internet Service Provider, or additional records from a third party, information stored or retrieved for this purpose alone cannot usually be used to identify you.
Marketing
The technical storage or access is required to create user profiles to send advertising, or to track the user on a website or across several websites for similar marketing purposes.